Adding/Editing a Lesson
| Site: | MDX Sandbox 1 |
| Course: | Introduction to Moodle S&T |
| Book: | Adding/Editing a Lesson |
| Printed by: | Guest user |
| Date: | Tuesday, 16 June 2026, 11:51 PM |
1. Lesson Activity
The lesson module presents a series of HTML pages to the student who is usually asked to make some sort of choice underneath the content area. The choice will send them to a specific page in the Lesson. In a Lesson page's simplest form, the student can select a continue button at the bottom of the page, which will send them to the next page in the Lesson.
In this Book you will find out more about:
- Lesson settings
- Building Lesson
- Using Lesson
There are 2 basic Lesson page types that the student will see: question pages and content pages. There are also several advanced navigational pages which can meet more specialized needs of the Teacher. The Lesson module was designed to be adaptive and to use a student's choices to create a self directed lesson.
The main difference between a Lesson and other activity modules available in Moodle comes from its adaptive ability. With this tool, each choice the students makes can show a different teacher response/comment and send the student to a different page in the lesson. Thus with planning, the Lesson module can customize the presentation of content and questions to each student with no further action required by the teacher.
2. Lesson settings
This page explains the settings involved when first creating a lesson. To add a lesson to your Moodle course page:
- With the editing turned on, in the section you wish to add your lesson, click the "Add an activity or resource" link (or, if not present, the "Add an activity" drop down menu) and choose Lesson
- This will take you to the Lesson settings page.
Lesson administration settings
General
- Note: Click the "Show Advanced" button to the right if you don't see all the options below.
Name
- The name you add here will be the link the students click on to get to your Lesson.
Time limit
- This allows you to set a time limit on the lesson. Students will see a countdown counter as they work. The timer does not stop them doing the lesson when the time is up, but correct answers are no longer scored.
Available from/Deadline
- Here you can set a start and end date and time for your Lesson.
Maximum Number of Answers
- Here you can set the default number of answer boxes available when you add your question or content pages. For instance, if you are only going to use True/False, you would only need 2. You can change this at any time so it's not crucial.
Password protected
- Change to "Yes" and enter the password if you want students only to access it when they know the password.
Grade
- Set a grade and grade category here.
2.1. Grade Options
Grade options
Practice lesson
- Use this if you don't need the lesson to be scored/graded but just need students to work through some pages.
Custom Scoring
- Use this to give a particular number score (negative or positive) to each answer
Re-takes allowed
- Choose this if you want your students to be able to do the lesson more than once.
Handling of re-takes
- If you allow your students to re-take the lesson, then decide here if the grade for all lesson attempts is the mean or the maximum.
Note that the Question Analysis always uses the answers from the first tries of the lesson. Re-takes by students are ignored.
Display ongoing score
- Choose this to let students see their score as they work through the lesson.
2.2. Flow Control
- Note: Click the "Show Advanced" toggle button to the right if you don't see all the options below.
- Using Lesson gives examples of how these settings may be put to best effect.
Allow Student Review
- This puts a "Review Lesson" button on the last screen of the lesson to encourage the student to navigate through the lesson again from the start. Be sure to check other settings to allow them to change their answers.
Provide option to try a question again
- This displays a button after an incorrectly answered question so that the student can try again (but not get credit for it)
TIP: Leave this off if you are using essay questions.
Maximum Number of Attempts
Decide here how many times you want students to be able to attempt each question. When they reach the maximum, they will be taken automatically to the next page.
Action after a Correct Answer
- Choose here where you want a student to be sent to if they get a question right. See Using Lesson for more details on this setting. The options are:
- the next part of the Lesson (default setting)
- a random, unexpected page
- a random page which they have not yet answered.
Display default feedback
- Choose this if you want to show a set phrase regardless of their answer. If you have set your own default feedback such as "well done; correct" or "never mind; better luck next time" etc it will appear. If you have not, then Moodle's default feedback will appear.
Progress bar
- Choose this to show a bar at the bottom of the page showing how far into the lesson the student has got.
*Note: There are currently some issues with the lesson progress bar not displaying as expected. MDL-26016
Display left menu
- Choose this if you want to show a list of the pages in the Lesson so a student can see what is coming up.
Display left menu only if grade greater than ...%
- Choose this if you want the student to go through the lesson (and get a grade) once and then, on review, to be able to see and navigate through all the different pages.
Number of pages to show
- You only need this if you have set "Action after a correct answer" to show an unseen or unanswered page. Otherwise, all pages will be seen.
Minimum Number of Questions
- Set here the minimum number of questions that will be used to calculate a student's score. Students will be told how many they have answered and how many more they need to answer.
- If you are using Content pages, then set this to 0.
- If you use this setting, then add some explanatory text at the start of the lesson so the student knows how many questions they must answer as a minimum. (They may answer more).
Link to an activity
- Choose this to give students a link to another activity when they reach the end of the lesson. (Note: this can also be achieved using Conditional activities)
Other options:
Pop-up to file or web page
- If you want to include a link to a file on the lesson page for students to refer to, upload it here.
Dependent on
- This allows access to the lesson to be dependent on students' performance in another lesson in the same course. (Note: this can also be achieved with Conditional activities)
3. Building a Lesson
This page is about how to structure a Moodle lesson once you have created it with the Lesson settings. For information on how best to use a Moodle lesson and how students approach it, see Using Lesson
Planning your lesson
- A lesson is made up of pages which may have content for the student to read or questions for them to answer. The questions can be created by the teacher or imported. The teacher decides the order in which these pages appear.
- You need to have a clear idea beforehand of what you want to do with this lesson. Is it to be a graded, linear learning experience? Or an ungraded, non-linear practice session? Will students be able to go back and revisit areas or is it just a once-only opportunity?
- Even those who are very comfortable working directly online might find it useful to note down on paper the direction they want their lesson pages to go in, rather than having to remember and visualize the navigation in their head.
- For hints and ideas about using the Lesson module, look at Using Lesson and Lesson FAQ
3.1. Adding Content/Questions
- When you have set up your lesson with the Lesson settings,click "Save and display" and you will be taken to the screen in the screenshot below.
- If you click "Save and return to course" instead, then click the "update" icon next to the lesson on the page and click "edit" in the Settings block>Lesson Administration
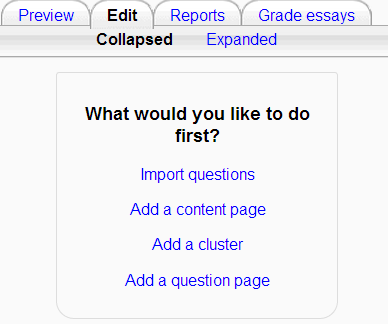
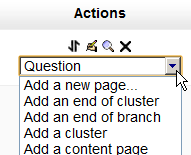
The most commonly used an basics of creating a Lesson are to:
Add a content page
This is a page where a teacher can provide information to move the lesson forward but without requiring the student to answer specific questions.
The student sees the page's title, some information and then one or more buttons at the bottom to select.
When the student clicks on a button, they go to the next page but their choice is not scored.
Add a question page
From this link you can choose from a variety of question types which will then be added as pages to your lesson:
(Note: These question types are not the same as for the Quiz and are in no way connected with quiz questions).
3.2. Adding a Content Page
- This is a page where a teacher can provide information to move the lesson forward but without requiring the student to answer specific questions.
- The student sees the page's title, some information and then one or more buttons at the bottom to select.
- When the student clicks on a button, they go to the next page but their choice is not scored.
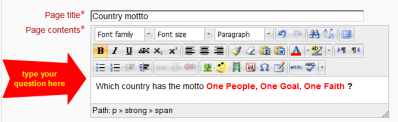
Title
- The title of a content page appears to the student at the top of the page.
- A teacher will also see the title in the collapsed edit mode when they are working on the Lesson, and they will also be able to choose the title (and hence this page) from the drop down "jump" lists.
- The title in a content page is also used with the "display left menu" setting.
Page contents
- This is where the teacher can add information for the student, making use of the Text editor and its multimedia features.
Content
- Here the teacher writes the words they want the student to click on to get to the next part of the lesson.
- These words will appear to the student as a button.
- The teacher can check the box to have the buttons appear horizontally, or uncheck it for them to appear centered vertically.
Format
- There are 4 format types to choose from when editing text in the content description box. If you wish to have the usual rich text editing icons, choose HTML format. (Note - once you have selected an option, you cannot then go back and change your mind!)However, if you DO choose HTML format, be warned that the student will not see the changes (such as bold or different colours) in the button.
Number of options available
- How many of these you have depends on your choice in the Maximum Number of Answers setting in Lesson settings
The Jump
- Each Description in a Content page has a Jumps menu. "Jumps" take a student from one page to another.
- A "relative jump" is "next page" or "end of lesson" whereas an "absolute jump" gives the actual name of a page.
- The teacher chooses from the dropdown the correct page to send the student to if they click on the button that will be made from this particular description. Any pages created by the teacher will have their titles appear in this dropdown, allowing them to be selected.
- When a student clicks on a description button, they are sent to the page defined in the Jump associated with the button.
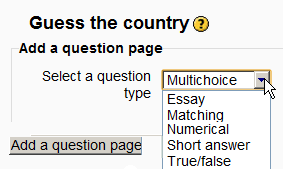
3.3. Adding a Question Page
- From this link you can choose from a variety of question types which will then be added as pages to your lesson:

- (Note: These question types are not the same as for the Quiz and are in no way connected with quiz questions.)
- The format of question pages is similar to content pages outlined in Section 2.4 above.
- A typical question page could include:
- Title - the name the student sees at the top of the question page.
- Page contents - the actual question
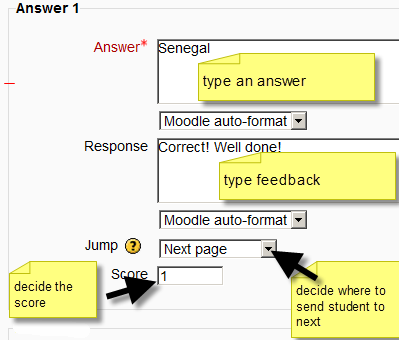
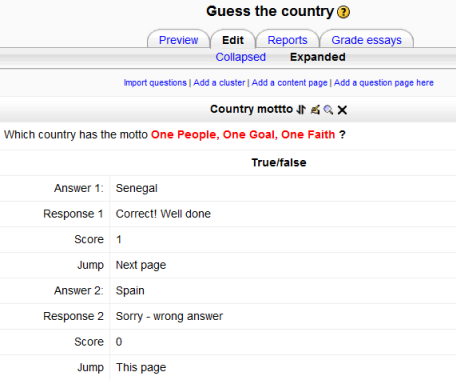
Answer/Response/Format/Jump/Score as in the screenshot below
Question types
Multichoice
- The student is given a question and a list of answers. The answer list will be shuffled every time the question is view by a student. By default they choose one answer but you can check the box "multiple answer" to allow them to choose more than one answer.
Essay
- Students can write a longer answer as part of the lesson and this can be graded manually by the teacher. If the main purpose of your lesson is for students to write an essay, consider the Assignment module instead.
Matching
- This allows you to set up lists which must be matched against other lists, for instance, words, pictures, numbers etc. The student must match all correctly to receive the score.
Numerical
- This requires a number as an answer. A number within a range may also be accepted as correct. The range separator to be used is the colon : For example, to accept as correct any number between 10 and 12 (10, 11 and 12) you would type 10:12 in the Answer box.
Short answer
- A student must provide a single word or short phrase answer. The teacher must anticipate the possible answers and enter them in the Jump dropdown boxes, using ** wild cards if appropriate.
True/false
- The student is given a sentence and must decide if it is true or false.
3.4. Moving Your Lesson Forward
- Once you have added your first content or question page, you reach the next screen which displays your page title/type/jumps (ie where the responses take the student to) and actions you can take next:
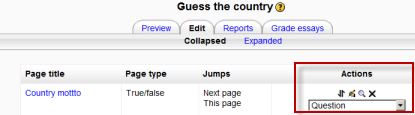
- The Actions icons allow you to move (if you have more than one), edit, preview or delete your pages.
- The drop down allows you to create another page of your choice:
Note the different view options (below the tabs):
Collapsed view
- This gives a brief outline of the lesson structure as in the two screenshots above.
Expanded view
- This shows more detail as in the screenshot below:
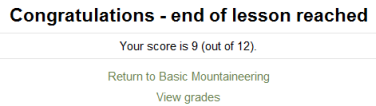
Ending your lesson
- To bring the lesson to a close, select the "End of Lesson" option from the Jump menu on any relevant pages.
- The student will then see a generic message as in the next screenshot, with a direction back to the main course page or to view their grades:
4. What the Student and Teacher See
What the student sees
- A student clicking on a Lesson will see an introductory page with one or more buttons which they choose from to select the path they wish to take.
- The display may vary according to how the teacher has set up the lesson in Lesson settings. For example; there may or may not be a list of pages down the side; there may or may not be an ongoing score.
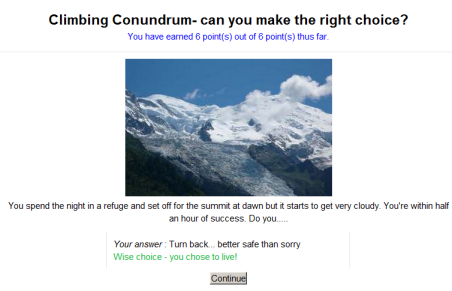
- Students progress through the lesson with either content pages (of information, which is not graded) or various types of question pages(which may be graded) When a question page is used, the following page gives the answer and feedback if offered:
- The lesson is ended when the student has met the criteria set by the teacher. This could be answering a certain number of questions correctly, accessing a certain number of pages with content (text, audio or video) or following a certain navigational path. A final page appears where the student can check their score, if applicable, and return to the main course page.
What the teacher sees
- A teacher clicking on a lesson will see tabs at the top offering them the chance to preview, edit, view reports or grade essays in the lesson:
Preview
- The lesson opens up in preview mode for the teacher. However, it will not show the score unless the teacher switches their role to a student.
Edit
- The Edit tab allows teachers to alter the lesson once it has been set up. There are two views - Collapsed and Expanded. See Building Lesson for more details on editing the lesson.
Reports
- The reports tab shows the performance of students taking the lesson. There is a general "Overview" and a "Detailed Statistics" tab.
Overview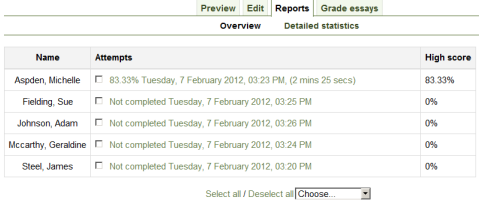
By clicking on the specific attempt, the teacher can view the student's answers to specific questions. It is also possible to delete a student attempt by checking the attempt and using the pull down menu to change "Choose" to "Delete".
- Below the "Overview" can also be seen general statistics: Average score, Average time, High score, Low score, High time, Low time.

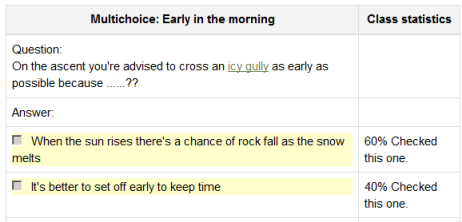
Detailed Statistics
More detailed reports on individual questions are available from this tab, as in the following screenshot:
Grade essays
- Any essay questions which have been set in the lesson can be accessed and graded here.
Grading lessons
- Note that for a lesson to be graded, it must have at least one question where a student can receive a score and the lesson can not be a practice lesson. Grades are calculated when the student has completed a lesson. Grades are kept for every student attempt.
Background Colour
Font Face
Font Kerning
Font Size
Image Visibility
Letter Spacing
Line Height
Link Highlight
Text Colour